
I needed a break from machine quilting so thought that I would finish one of the UFOs that I found in the attic. I also had to try out a small sewing machine that I had bought for classes and retreats. I’m going on a retreat in May and thought that I should see how the machine sews. It doesn’t have a thread cutter or automatic threader. It’s a basic machine. I bought it from a friend about one year ago and hadn’t even looked at it.
The UFO that I chose was a small quilt in a plastic bag. Several pieces had been cut out and sewn. How long could it take me? It was only 40′ X 40″. I couldn’t remember why I didn’t finish it.
I usually sew in the sewing room, but I decided to sew on the dining room table so I could look out the slider at the lovely spring weather. Actually, the weather is the same out of the sewing room window, but the back yard is beginning to green up.
All the pieces had to be pressed and organized. That didn’t take long. I read the confusing instructions and looked at the diagram. The instructions were in two parts. The first told how to make the components of the quilt. The second told how to sew the components together.
The first part was originally finished. Four 1 1/2″ x 18″ strips were sewn together. This was cut into four 4 1/2″ pieces. This is what the second instructions said – “Take a 3 1/2″ square an sew a strip of 1 1/2″ fabric to the left and right sides, trimming and pressing as you go. Next add strip to the top and bottom, again trimming and pressing as you go.” Repeat and make 25 squares. These squares measured 5 1/2″ x 5 1/2″. Five squares with borders and the first four were to be sewn into a 12 1/2″ nine patch for the center of the quilt. How can 4 1/2″ squares be sewn to 5 1/2″ squares? “. First error in the instructions. It should have said “trim to 4 1/2″ square”. I trimmed with a Tucker trimmer and the center was fine.
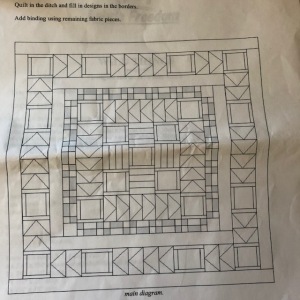
The quilt has a diagram for placement of the components. I count 21 squares with borders. Where do the other four squares go?
The 24 flying geese on the first border were already made, so they were sewn on. The next 2 1/2″ square and rectangle border had to be sewn. As I was sewing, the sewing machine started to slow down. It finally stopped and wouldn’t sew anymore. I will have to take a trip to the repair shop. I’m so glad that this happened here instead of when I was at the retreat. I went to the sewing room to finish on another machine. It was easy to make the 1/4″ seam the same on both machines.
Sewing was smooth out to the last flying geese row. The flying geese were sewn with no problem. The instructions are – “Sew your remaining flying geese together in pairs and join the left and right hand side pieces together, then attach to the quilt. Next, join your top and bottom pieces together and attach to the quilt.” Looking at the diagram, I made the strips. When I placed the strip on the main quilt body, the strip was 4″ short. After looking at it for a while, I realized that the four extra squares belonged in the center of the strips. It went together perfectly after a little unsewing and inserting.
 The instructions have been filed in the round file. It’s not worth passing it on to a friend. It’s a bright, cheery quilt and will look very nice on my dining room table. The quilt pattern was designed for a fabric line. Apparently there were animal squares to use for the 3 1/2″ squares. The title is “Wild Things”. That’s appropriate.
One UFO down, many more to go.
Have a great day and happy quilting.

Oh this one really turned out great 😀 Such a lovely pattern and your fabric choices are fabulous and spring-like. It’s getting spring here as well and I can totally understand you want to enjoy as much of that weather as possible.
LikeLike
Thank you for your kind words. I’m enjoying watching your adventures. Your work is awesome.
LikeLike
No problem and thank you 😁
LikeLike