

The Christmas cactus has outdone itself. It is full of blossoms. Maybe it is a Thanksgiving cactus. qui
Making Dear Jane blocks is addictive. Some are very easy to piece. Some are very hard. I’ve found that the hard ones are best if pieced by hand or paper pieced. The easy blocks can be paper pieced also. Sometimes it’s easier to paper piece than to figure out the measurements.
The blocks are 4 1/2″ square. It would seem as if they wouldn’t take as much time as a larger block, but sometimes they take just as long to make. The applique pieces even though they are very small, take time to position and sew down. The hand quilting time is much shorter and the binding doesn’t take too long to sew down.
I’ve been making the blocks in the potholder method. Every block is hand quilted and bound. Then they are sewed together. The binding makes a nice sashing.
The Dear Jane blocks are the perfect size to take to a sit and sew. I try to keep a few ready to take when I go out. I have several blocks in different stages of construction in a basket. Some are pieced and ready to quilt. Some are quilted and have the binding sewn on and are ready for it to be tacked down. Some have the applique ready to sew. I like to applique at home and do not take these until they are ready to quilt and bind. Every block is in it’s own baggie with a picture of the block and it’s position on the quilt.
I’ve been making them this way and found that I have more finished than I thought. Row A is finished. 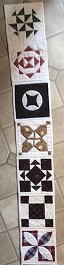

The instructions for row B are in baggies with the fabric that I will use for those blocks. I’ve started piecing the Row B blocks. When they are finished, I’ll do the same with Row C. Row D is completed and is sewn onto the body of the quilt. Row D is the top row. There are four more blocks sewn on that are outside the picture.

I originally planned to start in the center of the quilt and work the rows around the center. The center block is the green circle that is four down and seven over from the left. Somehow, that plan fell away and I was making a lot of blocks out of order. Eventually, they will all be sewn into the quilt. 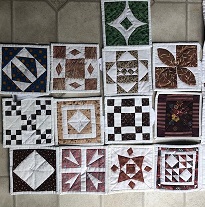
Jane will take a rest for a while. I have several other projects that need finishing. I’ll bring her out again when I run out of blocks to take to a sit and sew.
Have a great day and happy quilting.


 After a hard day at work, they are taking a much needed rest. I can imagine that they are discussing their work and how much they enjoy it. Miss Molly was generous enough to let Rufus sleep on her quilt.

 Did you know that if you insert one inch strips into a block, the block will be the same size when it is finished. I cut the Mile A Minute block in quarters and inserted strips. When placed in the Attic Window setting, it looks like windows.
 I was looking for some fabric when I found some cute kitten fabric. I was inspired to fussy cut the kittens and place them in the middle of the block. In three hours, I had enough blocks to make this cute baby quilt. The sashing and borders didn’t take long. It just needs quilting and some baby will have a pretty quilt.


 A bed quilt came back from the long arm quilter. The binding is on and half sewed down. The quilt was made with block patterns from Kimberley Einmo’s block book. I used solid fabrics for this quilt. The solid fabric drawer is still full. This is the second quilt that I’ve made from Kimberley’s book. I plan to make quilts with all 250 blocks eventually. The blocks in her book seem large after working on Dear Jane’s 4 1/2″ blocks.
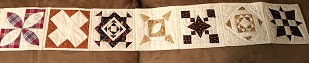

 I’ve printed the chart for the block placement and inked the finished blocks so that I would know which blocks were left to sew. The first three blocks from Row I are missing. I sewed them today and they are ready to quilt and bind. The little blocks don’t need much quilting so they are finished quickly. I will be working on this quilt for a long time.


 I had purchased the remains of fabric bolts from a closed quilt shop. There were several bolts of pillow panels. I didn’t want to make pillows and used the yardage for backs. This one worked for a masculine quilt.

 Last year, I made the Blockbuster quilt with Japanese fabric. I had a lot of that fabric left over and pieced the back.
 I still have lots of scraps. In a perfect world, I have a good system for taming them. Of course, I don’t always put them where they belong. I do have a bin for fabric that I might “file” in the right drawer some day. I bought four Ikea wire drawer units. They are stacked two tall and are in closets. The drawers can be removed and the fabric dumped out to check for what I need. These scraps are the larger ones. The scraps are folded and each color has it’s own drawer. There are drawers with Asian fabric, Ginny Beyer fabrics, solid fabrics, etc.
 There is a drawer with purchased pre cuts and panels. It would be nice if the fabric would stay folded, but after looking through a drawer to find what I need, I don’t always refold.
 Once in a while, when I finish a project, I will make my own precuts. I cut 10″, 8″ 5″, 3 1/2″ and 2 1/2″ squares. They are stored in a plastic drawer unit, waiting for the right project to come along.
 Then, there are the Mile A Minute scraps. They seem to grow overnight when I’m not looking. I thought that I had used them up but I found two big bins in the attic. Fortunately, I’m teaching a class at the Guild and will give them away to the students. The scraps are in all colors. I’ve separated them into strips and scraps. The fabric has been pressed and is ready to use.
 I kept the blue fabric that was left over from the Canadian 150 quilt in a separate bin that I bought at the Dollar Store. I’m making a few samples for the Mile A Minute class with this fabric. When the samples are finished, the left over fabric will go in the bags with the other fabric. Hopefully, all this fabric will be gone by the end of the class. Of course, I can always make a few more Mile A Minute blocks.
 It is so good to finish a few quilts and blocks. My plan is to take each UFO, one at a time, from the pile and finish it. I’ve finished two more Dear Jane blocks. There is one more pieced and quilted block to bind. After that, I plan to piece the block that is numbered A3. I had already pieced it, but I didn’t like the way it looked, so I will make it again. Row A will then be complete and then I will start piecing Row B. Dear Jane isn’t really a UFO. It is a long term project that I work on between quilting other things. Eventually, I will finish the quilt.
 I found a partially quilted quilt hanging on a hanger in the closet. It has been an UFO for a very long time. I originally started to hand quilt it. The last time that I pulled it out, I machine quilted a portion. Yesterday, I finished machine quilting it and started to bind the quilt. It’s a planned scrappy quilt. The red and green fabrics make it look almost like a Christmas quilt.
 The back is a surprise. It is pillow panel of wild animals. The panel was one that I bought years ago when I purchased yardage from a discontinued quilt shop. I’ve used most of that yardage but I’m still finding ways to use the little bit of fabric that is left.
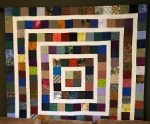
 The new quilt was made in a class that I took in Vermont many years ago. The teacher told us what colors to use. They were out of my range of colors. When the quilt was finished, I didn’t like it. A few years later, I won a certificate for long arm quilting. I didn’t know the quilter or her work, so I decided to send this quilt to her. When I received it back, it was beautiful. She made the quilt come alive. Now, I like it very much.
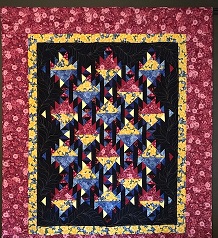
 Several years ago, I was flying from Salt Lake City to Arizona. As we flew over the canyons, I looked out the window and remarked that I would like to make a quilt in those colors someday. The quilt on page 30 had all the canyon colors.
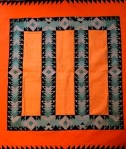
 I was reading some older magazines that a friend had given me. In the May/June 2008 Fons and Porter Love Of Quilting magazine, I found an article by Gerald E Roy. It used a lot of half square triangles. I had cut a lot of scraps in 2 1/2″ squares and wondered what size they would finish if I made them in the accordion method. They finished at 2″ so I decided to reproduce the old quilt in this size.


 Draw a diagonal line both ways on the one 5″ square. Layer two squares right sides together and sew 1/4″ on each side of both lines.
 Using the Tucker Trimmer, find the largest triangle, place the line on the stitch line and trim the edges. With a 5″ square, I could trim a 2 1/2″ square, making a finished 2″ square. Press open to the dark side.
 I put everything aside and decided to play with the rulers and figure out how to use them. The solution for the crooked clam shells was simple. Originally, I started quilting on the bottom and went above the first row to quilt the second row. I couldn’t see where to line up the clam shells. I turned the practice piece around and quilted the clam shells on the bottom up side down. Then, when I quilted the second row, I could see the top of the first row and adjust the ruler to the right spot.


