I hope that everyone had a great Thanksgiving. We had our family Thanksgiving on Saturday. Not as many came as usual, but we had a great time. Some were working, some were far away. We missed the big crowd that we usually have, but those who were here enjoyed visiting with each other. We have a pot luck meal. I cooked the turkey and some vegetables. Also the fudge pudding that always has to be on the table when the family gets together. There was new and old recipes. Everything was delicious. There were four generations at the table. We figured that six generations of the family have eaten at that table. It might even have been seven, if Nan’s mother or father had been at her house some time. They were gone before I came to the family so I don’t know if they did. What stories the table could tell.
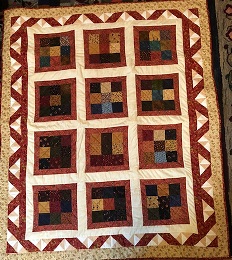
I saw a picture of a quilt in Pinterest. It looked like it would be easy to make and would be a great quilt to practice free motion quilting. The pieces should be 4 1/2″ and the sashing 2 1/2″. I would need at least 60 squares. When I checked the attic, I found several bags of color coordinated pressed fabric. I decided to cut all the fabric into squares. There were two drawers full of fabric.
It looked pressed, but it needed a little more help. I started pressing and cutting. It took most of three days. There was a lot of fabric. I am so glad that that part of the job is done.
 As I laid each piece on the cutting mat, I cut the largest square that I could. Then, I cut smaller and smaller until the whole piece was gone. Some pieces could be laid on each other and several squares could be cut at once. My favorite ruler is the Tucker Trimmer. It had a workout the past few days.
 The larges square was 5 1/2″ I will put them in the drawer with other charm squares. There should be enough squares that size for a quilt.
 I think that I did cut enough 4 1/2″ squares for the quilt that I want to make. Maybe even enough for two quilts.
 The next size was 3 1/2″. I can make nine patches for Linus quilts. I have several flannel pillowcases that I will cut apart for the backing for baby quilts. When I get to it, I’ll figure out how many nine patches I need to fit the pillow cases. I should be able to make several quilts with this size squares.
 The smallest square in 2 1/2″. There are over 1,000 of these small squares. I have seen pictures of quilts made with this size square. One will surface when I get to use this batch of squares.
 As I was cutting and throwing away the small scraps, I remembered the time when I kept every little scrap for the Gaa-Barge project. I decided to save some of the little scraps to finish that project. I had planned to make one Gaa-Barge a week for a year. I made only 32 so I have 20 more to make. The small pieces saved in this box will be enough to make all 20 quilts.
I was hoping that no one would drop in today, even though I love drop in company. Scraps were on the floor throughout the whole house. Both Miss Molly and I spread them through the house on our feet. Dishes were soaking in the sink. They are now in the dishwasher which I use only when I have a party. Clean laundry was piled on the bed, waiting to be folded and put away. I had to concentrate to finish cutting. Everything is now cleaned up and put away. The cutting is finished and I can now sew.
 I did sew for 10 minutes on the quilt. It won’t take long to finish sewing the top. It sews together beautifully. The quilt will have one row of colored squares, then a row of white sashing. The last row will be the colored squares. That will be the border. Because the sashing is cut 2 1/2″, the 4 1/2″ squares line up perfectly on each row. I could make a smaller version of this quilt with the 3 1/2″ squares with 1 1/2″ sashing. It’s a thought. I’ll have to figure out how many rows it will take to be the same size as the flannel pillow case. Maybe I could sew two pillow cases together and make a larger quilt. Half the fun is in the planning.
Have a great day and happy quilting.

 Tonight, I worked on the wall quilt. I love to applique, but for some unknown reason, I’m having a hard time appliqueing the pieces down. I haven’t appliqued for some time but I should remember how to do it. The big rose was easier to applique than the small rose, so maybe by the end of the week, I will be doing better.
 I’m appliqueing with bottom line thread from Superior Threads. It is a fine thread. Using the proper color, the thread disappears. When I saw the bobbin case full of the different colored threads, I knew that I should find every color that I needed. There is a lot of thread on the bobbins. I do have to use short lengths of thread which is o.k. as each piece of fabric that is appliqued is small.
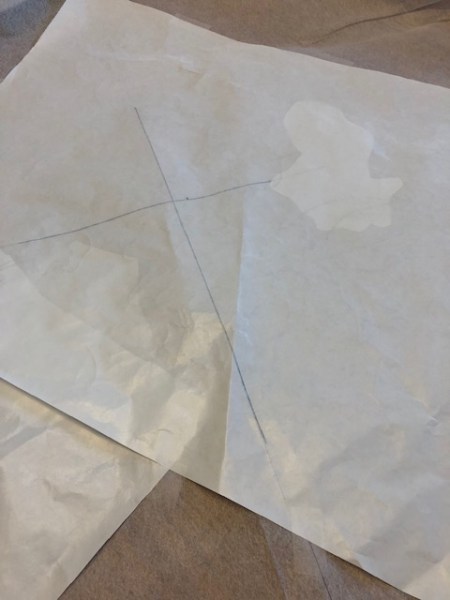
 The first flower has been appliqued on the wall quilt. It is the rosebud on the top of the swag. The next flower is a large rose. There are also day lilies, poppies, and trumpet flowers. I am going to applique the flowers on the right side before I choose colors for the left side. They will be the same colors, but I want to balance the colors in the piece. I should probably do applique during the day instead of in the evening when I’m tired and watching TV. I think that they would look a little better. All the fabric and diagrams for the wall quilt are now contained in a wire drawer. The drawer can be removed easily when I’m working on the wall hanging and put back, out of sight, when I’m not working on the project. The line in the fabric is the cross line to match up the blue fabric to the master pattern. There is also a horizontal pressed line.

 The three cousins had visited Miss Molly in Maine last summer. They had a good time, except that Odie took over Miss Molly’s spot of the sofa.
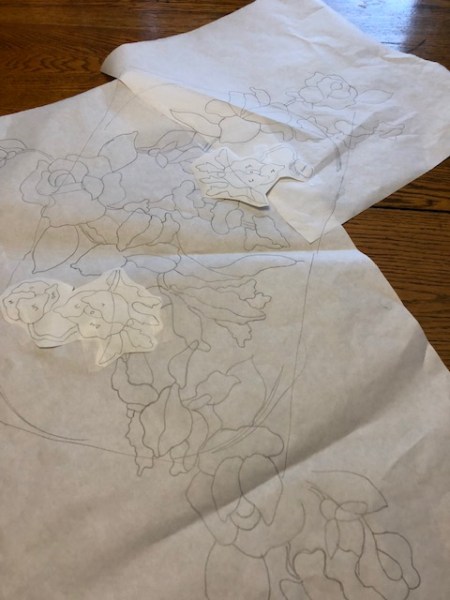
 Then, using the light box, I transferred the pattern to a large piece of stabilizer. This stabilizer pattern will be the diagram for placement of the applique pieces. The hardest part is figuring out which pieces should be appliqued first. The freezer paper diagram will be cut out for the patterns. I haven’t decided whether I will cut out and applique each flower separately or cut out and number all of them.
  I want to use the flowers from my garden for color inspiration. Several photos are in the file and I placed them where they should go so that I can see how it should look. I may look in a flower catalogue for other color inspiration. My flowers are very similar in color. I’m still deciding which fabric will be the base for the appliques. There are two contenders.
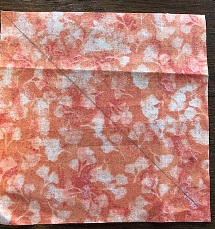
 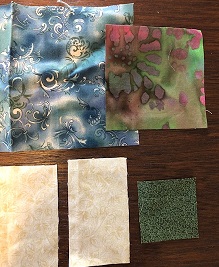 1 -3 1/2″ dark medium square, 1 – 2″ square of dark medium, 2 – 2″ x 3 1/2″ of light and 1 – 5″ square of dark medium.
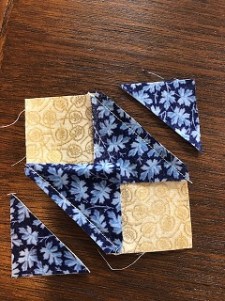
Stitch together with a 1/4″ seam like this.
1 -3 1/2″ dark medium square, 1 – 2″ square of dark medium, 2 – 2″ x 3 1/2″ of light and 1 – 5″ square of dark medium.
Stitch together with a 1/4″ seam like this.

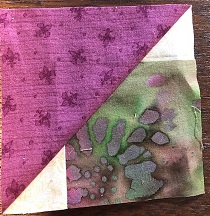
 Draw a diagonal line on the 5″ block.
Place onto the pieced block RST with the diagonal line beginning and ending on the light rectangles. Stitch 1/4″ on each side of the diagonal line. I pinned the two pieces together so that they wouldn’t shift.
Cut on the diagonal line to create two squares. Square to 4 1/2″ There is just a sliver to cut off.
Draw a diagonal line on the 5″ block.
Place onto the pieced block RST with the diagonal line beginning and ending on the light rectangles. Stitch 1/4″ on each side of the diagonal line. I pinned the two pieces together so that they wouldn’t shift.
Cut on the diagonal line to create two squares. Square to 4 1/2″ There is just a sliver to cut off. One square will look like this.
The other will look like this.
One square will look like this.
The other will look like this.
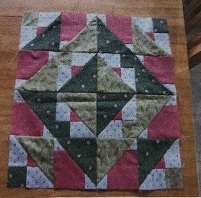 Assemble to create a pleasing design. Use lots of scraps for a different look. You can use charm squares for the 5″ pieces.
The picture of the square has 16 – 4″ pieces. I found that if you want a block that is color coordinated like the one in the picture, you have to make four squares in two different colorways.
An other possibility would be to make a 4 patch block with the pieces twisted and turned other ways. The blocks are so easy to make. It would be fun to make several and play with a setting. I do have a lot of 2″ off white strips leftover from another project. If the background was the same color, it might work.
Have a great day and happy quilting.
Assemble to create a pleasing design. Use lots of scraps for a different look. You can use charm squares for the 5″ pieces.
The picture of the square has 16 – 4″ pieces. I found that if you want a block that is color coordinated like the one in the picture, you have to make four squares in two different colorways.
An other possibility would be to make a 4 patch block with the pieces twisted and turned other ways. The blocks are so easy to make. It would be fun to make several and play with a setting. I do have a lot of 2″ off white strips leftover from another project. If the background was the same color, it might work.
Have a great day and happy quilting.

 I saw a beautiful quilt on the Missouri Star Quilt Company web site. It was a simple nine patch that was cut and the pieces turned in a different direction. It was different than the other blocks that I had made. The nine patches were set without sashing. I decided to make half size blocks so that I could make another Linus quilt with the technique. Nine patches are easy. I didn’t need to look at the tutorial to make them. The nine patches sewed up quickly. Somehow, it didn’t look right. I went back to the tutorial to see how the nine patches were cut. That’s when I discovered my big mistake. Five of the pieces of the nine patch were supposed to be white. I used all dark and medium pieces. They would have made a very dark quilt. That’s when the quilt was named “The Mistake”. I decided to put white sashing between the blocks and add an unusual border to take the eye away from the center. It worked. It turned out to be a pretty quilt. Maybe I should rename it “Lemonade”.
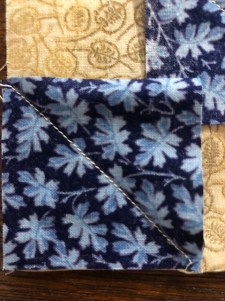
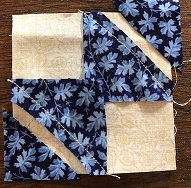 Ann and Sue’s way is to cut the inner small square leaving the large square intact. No matter how accurate you sew, the triangle might be a little over or under the line. When you add this piece cut this way to another in the block, it will still be an accurate cut.

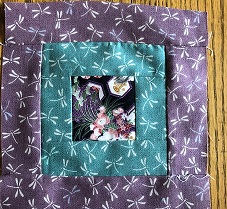 Block 29 is a 6″ block. It is called Courthouse Step and was designed by Carrie Nelson. This was a quick block to make. There were only nine pieces and all straight sewing.
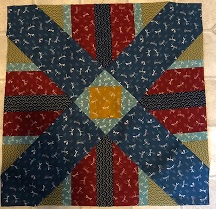 Block 30 is an 18″ block. It is called Gaudi and was designed by Brigitte Heitland of Zen Chic. This took a little longer to piece than block 29. The triangle pieces were pieced in strip sets and then trimmed to the triangle. The center was a square in a square unit. The measurements in the instructions were not right, but I was able to adjust and make the center unit the right size. It called for 2″ squares to flip and sew on a 3 1/2″ base, when it meant to add triangles to all four sides of the center 3 1/2″ square. If I had followed the instructions, the center would have finished at 3 1/2″square. It needed to be 4 3/4″ which is the same size as the ends of the larger cross pieces.