 Quite often, when making a quilt or experimenting with a new procedure, there will be orphan blocks left over. Several years ago, when I looked at the orphan block bin, I found that there were two colorways and wondered how it would be if I put all the blocks from one of the colorways together into a wall hanging.
It was fun to lay out the blocks. When they didn’t fit, I added strips so the piece would lay flat. I still have the quilt top made from the other colorway, but it is in my UFO bin.
 These two pieces were left over from trying curved piecing.
 I had a class with Georgia Boonesteel and made a bargello vest. This piece was left over from that class. I have never worn the vest because I forgot that the piece would shrink in size when hand quilted.
 I had a class in crazy quilting. This piece was not finished, but was put into the leftover quilt anyway. The colors were right.
 I love making Inner-city blocks. Originally, I was self taught and didn’t know that Y seams were supposed to be hard. They are not. I will show you the original inner-city wall hanging at a later date. It was one of my first wall hangings.
 Flying geese, half square triangles, bow ties, paper piecing and , pinwheels was included in this leftover piece. I did a lot of experimenting when I began quilting.

Have a great day and happy quilting.


 I’m not sure who received some of the quilts, pillows and tote bags. I did find that I had written “Christmas 2003” on the back of the pictures of two of the pillows. “Mother” was written on the back of the pictures of two other pillows and the tote bag. I have the tote bag, but don’t know where the pillows are. When I pull the other pictures from the sleeves, maybe it will remind me who has the gift.

 I did a lot of embroidery work in that time period. I noticed that several of the quilts have embroideries. They are so pretty. I should take time to make some more. I think that I stopped as everyone had their fill of my embroideries.
 The quilt at the last posting.
 The quilt now
 The pieces ready to add to the quilt.

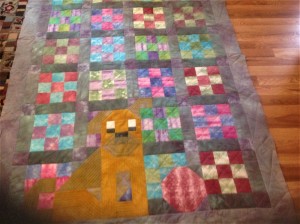 I saw this quilt when Billie Lauder, the quilt designer, was on Alex Anderson’s Simply Quilts television show. I had taped the show, so I paused it and drew the design. The quilt is called “Help, There’s a dog on my quilt”.
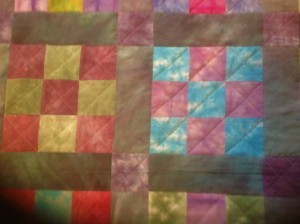 It’s amazing how a simple nine patch can be so interesting when changing a few of the pieces. The nine patches are made with hand dyed fabric. The quilt is machine quilted with a walking foot.
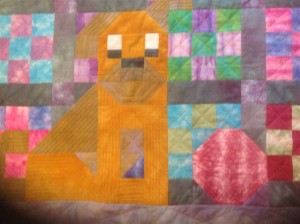 The dog came alive when quilting was added.
 The second quilt in the book is called Double Duty. At first glance, this quilt looks complex, but it isn’t. It consists of flying geese and log cabin blocks. The blocks are set on the diagonal. Carrie used fall colors for her quilt.
 My quilt used reds. greens, browns and blues.
 My daughter’s quilt used blues and yellows.
 The first is a two sided bag It is 8 1/2″ x 10″ The dragon side is stipple quilted. The Flower side is heavily quilted with gold thread before the flowers were added.


 The little purse is 3 1/2″ x 3 1/2″. It is also made with made fabric. It is stippled quilted and then gold and silver cords are couched on the piece. A small embroidery is on the flap.
 The last purse is 6″ x 6″. Green fabric was sewn into made fabric. It was quilted using the built in embroidery stitches in the machine. The decorations were couched on. They ae a rosy pink, which is a nice contrast to the green purse.
 UFO – I bought the dragon fly fabric just because I liked it and the blue dragon flies was a companion fabric. I didn’t know how I would use it when I bought it. The table runner was pieced, but not quilted. The border is quilted with a walking foot and the center is free motion quilted around the dragon flies. I will keep this table mat and not put it in the give away bin.
 Two of my Granddaughters are expecting babies. This is the first one finished. It will go into the mail today on it’s way to a baby shower.
  I originally bought the cat fabric and intended to use it on the front of the quilt. I couldn’t cut it up so decided to use it on the back. The front is made with nine patches, using all the cat colors. I made two different color nine patches. One was blue and purple and the other orange, green and yellow. When sewn together, It almost looks like an Irish Chain.


