
Last Friday night, David LaValley from the Bittersweet Fabric Shop gave a talk at the Guild meeting. He spoke about thread and needles. We learned a lot about thread and using the right needles in our machines. He had some supplies and I bought purple machine quilting needles and some Teflon needles to use if I make something with fusible applique. It’s always nice to be able to buy something that will make quilting easier. I did use the purple needle today and it made a smooth stitch. I also bought a little black plastic thing that holds a needle when a needle is replaced in the machine. It does work. It was much easier to change the needle. I have always had trouble hitting the right spot.
On Saturday morning we had a rescheduled class with David Taylor. He taught invisible machine applique. I did have the same class last year at the Vermont Quilt Festival, but wanted a refresher.
 The other students made a small piece with an apple tree, a basket and a wine bottle. I had already made that piece last year, so I was able to make a sweet pea piece. I was given a beautiful piece of hand dyed fabric to use for the sweet pea. It took a while to position the freezer paper pattern on the fabric. I wanted the lights and shadows to be in the right spot. I took two pictures of the pieces with different colorations and decided which one looked better.
When the sewing machine settings were just right, I took a picture of the screen so that I could finish at home if I didn’t finish in the class. I can also use the setting to make other projects.

The applique was finished this morning.
 David has a CD that teaches how to quilt pictorial quilts. The CD is short, but it has a wealth of information. He quilts slowly on a Sweet Sixteen. All the instructions can be transferred to a domestic machine. When I started quilting I found it harder to forget my way of quilting than to quilt his way. David recommends using the stop and start button when quilting. I found that hard to do at first, but by the third petal, I was remembering to push the button to stop. After a little while, I really enjoyed quilting his way.
 He quilts with variegated thread. I have some, but not the right colors so had to use plain thread. The thread is the same in the top and bobbin. The quilting starts in the middle and works out to the sides. Each petal has to be completed before going on to the next one so there are many thread and bobbin changes within each petal. It was worth winding all the bobbins before I started. Every thread is pulled to the back, knotted, and buried between the layers. This seems to take longer but when you are done, the back doesn’t need to be cleaned up. The tension can also be checked on a regular basis.
Maybe, I can make the old world Santa wall hanging, now that I am comfortable with this procedure. I’ve had the pattern for years.
Have a great day and happy quilting.
 I found a few small quilts that I made several years ago. The teddy bear and the cat are applique with embellishments. I’m not sure why I didn’t quilt the background. They were made while I was still hand quilting everything and I probably didn’t think that they were worth quilting. It wouldn’t take much time to machine quilt the background and finish them. I’ll do that some day when I have nothing else to do. I could use them for free motion quilting practice.
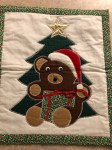


 The yoke has flat lace in the front. Gathered lace goes around the collar and down around the yoke.
 There are two rows of ruffles at the bottom.
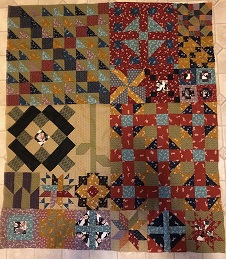
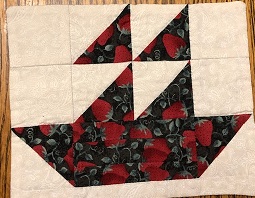
 6″ block
 16″ block

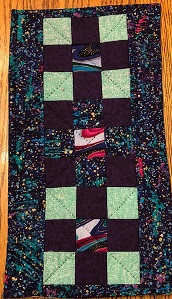


 The tenth little quilt is made of strips of all the leftover fabric. It is the only one that is quilted on the machine. It is 11″ x 15″.
 My Christmas cactus has been blooming non stop since Thanksgiving. I have three plants on the windowsill. The two outside ones have bloomed once in a while, but the center one has outdone itself this year. The trick is to enclose the plants at night with thermal drapes. They enjoy the cold from the window. You wouldn’t think that cactus would like the cold, but they bloom much more if they are not in heat all the time.
 The top that was made from the fifty 6″ blocks from Kimberly Einmo’s book is pieced. I don’t know if I will send it to the long arm quilter or quilt it myself. I’ll hang it on a hanger and decide when the ones in front of it are done.
 Another quilt top from Kimberly’s book is finished. It uses her 12″ blocks.
 The third quilt top was made from leftover blue fabric from the Canadian 150 quilt. It originally was a nine patch, but with a little cutting and resewing, it became a very nice top.
 This week, I added an iris, two poppies and have a mystery flower ready to applique. I think that it’s some kind of a hanging day lily. I pinned the pieces of the mystery flower to a paper so that I would remember which piece goes where and the order to sew them down. I may tone down some of the colors on that flower. It is dark. It’s easy to change my mind before the pieces are sewn down.

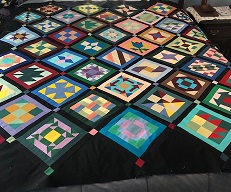
 I have made all fifty 6″ blocks in the Kimberly Einmo book, Pre Cut Bonanza. The book has 200 pieced blocks from cut strips and shapes. I intend to make all the blocks eventually. The quilt that was made with the 10″ blocks still hasn’t been quilted. It is on the “to do” list. There are still 8″, 12″, 14″, 16″ and big blocks to make. That is for the future. I’ll be checking magazines and the Internet for settings for those blocks.
 This is the first and second rows of the quilt. I’ll add the black setting triangles to the rows before I sew the rows together. I might even change my mind and use another color. I could even use half blocks in that spot. The quilt will speak to me when I get to that point.
 Block # 42 is a 12″ block
 Block # 43 is a 6″block
 Block # 44 is a 12″ block
 I have finished sewing the binding on a quilt. I was helped by my special helper, Miss Molly. She always lays on a quilt when I’m hand quilting or sewing binding. It must be her pre-quality control inspection. I’ve learned to take a big handful in my lap, leaving her just enough to be comfortable.

 They could hold small treasures. .
 I still have three empty boxes and several flowers. When the shelf is up, I’ll finish them. Then they can be with the others for a pretty display.
 Also in the basket were three small boxes that I made from greeting cards and a photograph. Greeting card boxes are very small, but are a nice way to present a small gift.
 The bottom box is make from a photo of Miss Molly. The photo was a little larger than a greeting card, so made a larger box.