
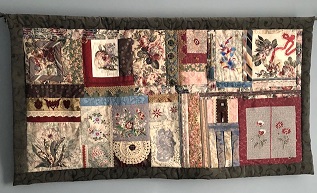
The Tapestry was made in the back door quilting method. Different blocks were made with different methods. After they were made, They were put together like a jigsaw puzzle. Strips were inserted to fill out some spaces. After the whole piece was together, a backing was sewn on. The Tapestry is very heavy. Very few people have seen it as it is too heavy to take to show and tell. I spent many wonderful hours with special friends as we all made our own versions of the Tapestry. Each one was different.
Two machine embroideries, stipple quilted with a border.

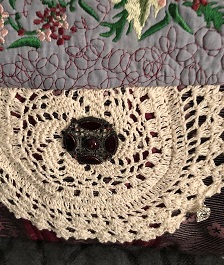
The twisted ribbon had squiggle free motion quilting around it. The beads were applied with the sewing machine. 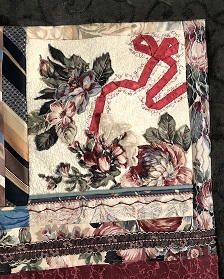 You will notice that the same rose fabric was used in different ways in the blocks. Jewelry and several other small objects were added to many of the blocks. Fancy buttons were added. Neckties were turned and couched down. Many laces, some antique lace were applied. Several of the blocks were piped. Some with double piping. Built in stitches were used as well as lots of free motion quilting. If we could think of a technique, we used it in this piece. When my friends do see it, they spend lots of time discovering all the little things in this quilt.
I did have the Tapestry appraised and was shocked at the low appraisal price. They said that it wasn’t even a quilt because it hadn’t been quilted through all three layers. It was appraised by a traditional quilter. Art quilts do get more recognition now.


Have a great day and happy quilting.
 The lilacs are in blossom. The deer must have been hungry this year as there are no blossoms at the bottom of the bushes. They enjoy snacking on the flower buds. One year, we had just one blossom that they couldn’t reach. I’m glad that the bushes are taller so we both can enjoy the flowers.
 The crab apples have outdone themselves. They are so beautiful that I don’t mind that the fruit is too small to be of any use.
 It’s lupine season in Maine. I have a pink lupine along with the purple. Lupine is a biennial. The pink lupine is in a different spot every other year.
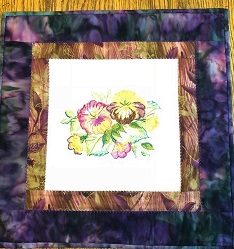 Ap
Ap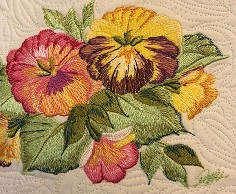 ril showers bring May flowers. May’s wall hanging is a Donna Dewberry embroidery. It is fun to watch the pictures come alive as each color is added. I tried painting in the Donna Dewberry method once and I didn’t think that I did very well. I came across my paintings the other day and they’re not bad. I should try it again.
 June is a picture of a little boy and his dog. He is out of school and is fishing.
 The cat and dog pieces were made with purple and other dark fabrics for the background and tan fabrics for the animals. The made fabric was made in the mile a minute method. The patterns for the animals came from a child’s coloring book. The cut out animals were fused down and then zig zaged around the edges with tan thread. The lines of the drawing were zig zaged with black thread.
 Shortly after I made these two pieces, I taught a class on this procedure at a local quilt shop. The pieces were my sample pieces. They were at the shop when a photographer came to take a picture of the owners. One of the pieces was grabbed and put under the needle of a sewing machine. The colors went with a piece that was on the wall behind them. I enjoy seeing my animal in the picture on the wall when I go to the quilt shop.
 I saw a quilt pattern called October Weekend and thought of the dyed fabric. It would be just right for the project. The pattern was diagramed like a cross stitch. Some of the squares were whole. Some were half square triangles and some were three pieces. I cut each piece separately, and arranged them on a flannel sheet so they would be in the right position on the quilt. It seemed to take forever to make this quilt. This was made when I worked on one quilt at a time. Not at all like today when I have four or five going at once, not to mention dozens of ufos.
 One of my daughters had a set of twins, a boy and a girl. I used a panel to make them their crib quilts. The quilts were alike. Very quick and easy.

 This is one of my favorite quilts. I made it when I first started quilting. It is machine pieced and hand quilted. For some reason, it is very comfortable to sleep under. For years, I took it to the Vermont Quilt Festival to place on my bed. It is my home away from home quilt.
 I collected the teal, blue and green fabrics in this quilt for several years. There was something missing. At the time that I was planning this quilt, I was teaching some of my co-workers how to quilt. As I was showing the students the fabric, one of them said “See what I bought at Keepsake Quilting ” and threw the pink fabric on top of my pile. It was the spark that this quilt needed. I called Keepsake and read the information that was on the selvage to them. A few days later, I had the yardage that I needed to make this quilt. This one is also machine pieced and hand quilted.
 The sixth quilt in the Miss Rosie Spice of Life book by Carrie L Nelson is called Open Door. Carrie made her quilt in blue, brown, and red. The colors in this picture are not accurate.
 She drew from her stash of fishing fabric for the rest of the piecing.

 It is a very simple piece. It’s not my favorite piece of gaa barge but it did use up lots of little white scraps .
 The easiest quilt to piece uses sashing and three borders. The mile a minute block is in a straight set. The middle border is a mile a minute piece cut 3 1/2″ and joined together to make a border long enough to go around the quilt.
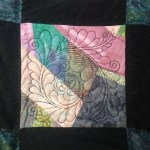
 Another option is to use a diagonal set. Oversize mile a minute blocks are cut in half for the triangles next to the border.
