
Today is Miss Molly’s birthday. She is nine years old. We have had her in our family since she was nine weeks old.
 Wire Fox Terriers are so cute when they are little.
Miss Molly used to dig holes everywhere when she was a puppy. I’m so glad that she stopped doing that. We had to be careful where we walked.
 Her brother was Max, a Miniature Schnauzer. Max was an awesome dog. Usually an older dog teaches a younger dog how to behave. Miss Molly didn’t listen to Max at all. She became the boss when very young.
Miss Molly is highly educated. She has passed level 1, level 2, and level 3. She was at the point of taking her companion dog exam when I decided she had gone far enough. She also has taken agility classes, sniff and search lessons, and dance lessons. She prefers to dance to Latin music. When dogs dance, it is just obedience done to music. She has a few steps, but only dances when she feels like it. I can hide treats and she searches until she finds them. Miss Molly will do anything for a treat. When meeting Miss Molly, you wouldn’t know that she had any training. She chooses when to obey. 
When I had Miss Molly groomed for the first time, she changed from a fluffy puppy to a very sophisticated dog.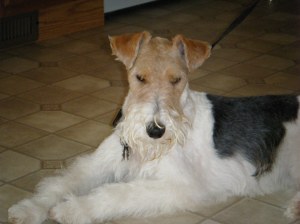
She is afraid of thunder storms.
Miss Molly takes her job of quality control inspector very seriously. She checked out the new Japanese fabric scraps. They passed inspection. We are allowed to use them. 
She loved the Canadian 150 quilt. Now she is inspecting a 30 year old UFO as I hand quilt it in the evening. It’s a good thing it’s a king size so I have space to quilt and she has space to inspect. 
Everyone should have a quality control inspector that is as good as Miss Molly.
Have a great day and happy quilting.
 The block is 18″ square finished and is made of flying geese. squares, and half square triangles. It was easy to make even though it looks complicated. Someone from the Guild will win all the blocks in a drawing. Even if I don’t win the blocks, I have the pattern and might make more blocks for my own quilt.
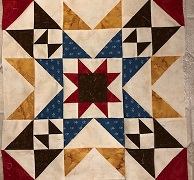
 The next block was a 12″ square applique block. I didn’t want to make an applique block, so I substituted the draw block, leaving out one row to make it the right size. It was quicker to make that the original block. The omitted row had eight small half square triangles in the corners. Leaving out that row didn’t detract from the block. It looks like a star within a star block.


 I still have lots of the Japanese fabric to finish this project and make at least two more bed quilts.
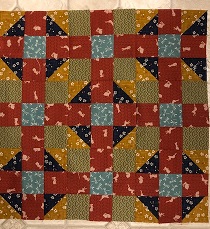
 Using the white sashing with green triangles on the corner give this quilt a secondary pattern. Green stars pop up when looking at it closely.
 This quilt was designed for the quilter to find their own quilt patterns. Hints were: find a pattern that begins with the first letter of your first name. Find a pattern that has to do with weather. Find a pattern that has an animal in it’s name. There were many other hints. Every quilt was different. The quilter could choose the size of the blocks and the setting.
 I don’t know why this quilt has only eight blocks. It looks as if I added fancy corner triangles to the two red center blocks to make them the same size as the outside blocks with the multiple sashing.
 Annie Louise is dirty and needs a new wig, along with new clothes. I’ve decided to clean her up and restore her. Pinterest has a site where it shows how to measure a doll and using a regular person’s pattern, cut it down for doll clothes. I have measured all of Annie Louise’s measurements. She is 19 1/2″ tall. Her bust line is the same as her waist. As I turned her over to measure her back, I noticed some letters on her neck. Now I know what she is.
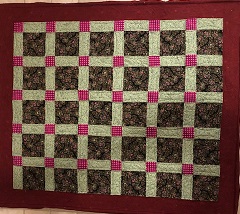 One of the reasons that I didn’t finish this one was that I ran out of fabric for the side and top outer sashing. It’s a good size for a baby quilt. The baby won’t notice. Better finished than perfect. Angela Walters has some very good YouTube videos. I’ve started to watch them and am going to practice whatever she teaches on my UFOs. On this piece, I practiced echo quilting with a ruler. It does make a straight line. The black squares are stipple quilted. The light green sashing has curved quilting. Angela showed how to both free motion quilt and ruler quilt curves. I free motion quilted the curves. I did find that the more I practiced, the better it looked. The red border is quilted with a leaf background filer. This piece will go into the giveaway bin.
 The second wall hanging was quilted with an even feed foot. It was just straight line quilted. I could have free motion or ruler quilted, but decided to just quilt it and have it done. After I finished it, I decided that it would look very nice as a topper on a white table cloth on my dining room table. I will keep this one.
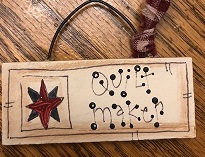 I quite often say that I am a quiltmaker, not a quilter. If a person makes tents, he is called a tentmaker, not a tenter. One of my friends gave me this pin today. I will wear it proudly and state that I am a quiltmaker.
 The center block had the dark background, It is a 3-D block. The sunflower petals are elongated prairie points. The leaves are two sided and attached by the vein stitching, It has two sashing borders. One is a light yellow and the outside border matches the fabric on the blocks that butt up to it. It is a straight set.
 One of the side blocks has pieced small squares for the center with prairie points around it. The stem and leaves are appliqued. It is on point and has triangles at the four corners.
 The other side block is appliqued. It is on point and has triangles at the four corners.
 The top block is a star. The pale yellow fabric between the star sides is gathered at the base. It is on point and has triangles at the four corners.
 The bottom block is a Dresden plate. It is on point and has triangles at the four corners.
 That left one block and four corners to fill. That was the block that I had made. I cut the Dresden Plate block into four pieces and framed it. Then I added strips to make a log cabin that was the same size as the other blocks.
 After the nine pieces were sewn together, I added a single gold frame. This wall hanging is different, but after all these years the blocks are finally ready to be quilted.
 The Temperature Quilt top is finished. It has been fun watching the weather all year. It is one quilt that when someone asks me how long did it take to finish, I can honestly say one year (365 days). That’s not the quilting, just the piecing. I’m not sure if I will quilt it myself or send it to a long arm quilter. It turned out to be a big quilt.

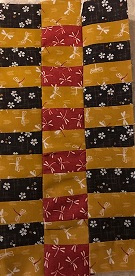
 This week, I finished three UFOs. The first one was made years ago. It is hand quilted. This month, I started keeping hand quilting and applique near my chair. It’s handy to pick up and work on it while watching TV. This is a fun pattern. Squares are cut and sewn together. Then, using a plastic template with cross marks, the squares are recut and sewn. It is made with all straight seams, although it doesn’t looks that way. There are small pieces left after the second cut. If the pieces are kept in the same sequence, a smaller version of the quilt can be made.
 The blue and green table runner is machine quilted. I practiced quilting it with circle rulers of different sizes. It has been in the basket for a while because I didn’t like the quilting. Today, I stipple quilted the blue pineapples and finished it. It is much better now.
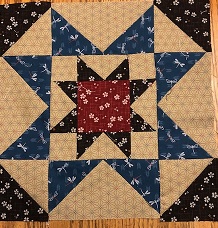
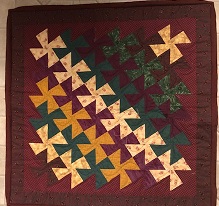
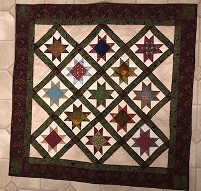 The star piece is small. It is hand quilted. I like the colors. Somehow, setting the blocks on point make the quilt look better than a straight setting. I can see a large quilt made with the small stars. Maybe, some day I will make a lot of stars and make a bed quilt. It would be a stash buster. Some of the Mile a Minute fabric is large enough to make small stars. I may start putting the larger pieces aside for that project.
 In 2009, I made wall hangings for each of my daughters, my daughters in law and one granddaughter. They all came for Christmas that year except for one daughter who lived in Virginia at that time.
 Several years later, another daughter mentioned that her favorite silly Christmas song was “I want a hippopotamus for Christmas”. I just happened to have a hippopotamus pattern. I retrieved the put away quilt from the attic and used it to make the hippopotamus. My daughter got what she wanted for Christmas that year.