
The Guild met last Friday night. David Taylor was our speaker. His quilts are absolutely awesome. It was a wonderful night that was enjoyed by all.
I’ve had two quilts at the long arm quilter. I quilt my smaller ones, but send the larger ones out. I knew that I had sent quilts that I made last summer, but I couldn’t remember what they were.
I’ve been looking at four block quilts on Pinterest, as I have a drawer of cut squares. They are cut 2 1/2″, 5″ and other sizes. There are a lot of 2 1/2″ squares and I’ve been looking for a pattern for them. There was one quilt that I thought would be perfect to use the squares.
 When I received the quilted quilt last week, I was surprised to see that I had already made that one in 5″ squares. Last summer, I took a box of scraps to Maine and tried to use them up. Now, I’m wondering what the other quilt at the long arm quilter looks like.
This is such a pretty quilt. It’s so easy to make. The white strips are 1/2 the size of the squares. It could be made with any size square with that formula.
 The quilting made the quilt. It is quilted in a pale blue. ‘The back is beautiful.
I may still make the quilt with the smaller squares. It could be made with beginners and enders. It would be a good way to use up that drawer of fabric.
Have a great day and happy quilting.
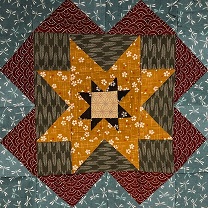
 This star quilt was made many years ago. The center poofs out. I either have to quilt it down or redo the center. It wouldn’t take long to finish it as it is a small quilt. When it is finished it will either go into the give away box or become a charity quilt.
 Years ago I had a stack and whack class with Bethany Reynolds. I should have used a floral print, but instead, used golfer fabric. This was the only quilt that I finished in a class. Usually, I have to finish them at home. After all the stack and whack pieces were sewn together, I realized that there were body parts everywhere going around in a circle. Who would want this quilt? Maybe if I quilted it and put it into the give away bin someone would take it away.

 I used to have a surger. It was a simple one but I didn’t like it. Probably, I didn’t practice enough to give it a chance. I did make one quilt, but the corners didn’t match. The surger wasn’t really made to make a quilt. It didn’t help that the fabric made it look like a big overripe watermelon. It’s the perfect size for a Linus quilt. When I finish it, it will have a home. Someone will like a cheery watermelon quilt.
 This brown quilt must have been made many years ago. There was a period of time when I used brown fabric in my quilts all the time. This is the only unfinished brown quilt that I have. It is pretty. Miss Molly has inspected it and thinks that I should quilt it and give it to someone who will enjoy it.

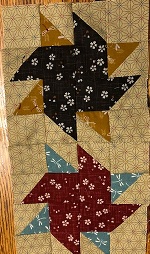
 I had some extra blocks so I found a feather quilting pattern that would fit. I used green Aurifil thread. It is very nice, but when I set it on the quilt to see how it would look, it was distracting. There were too many circles.
 I did some ruler work on the other blocks with different colored thread. Also some free motion quilting. I still don’t like ruler work. Maybe some day I’ll enjoy it, but I’ll have to practice a long time to get to that point. I’m glad that I practiced on other blocks and didn’t jump in and quilt something that I didn’t like. The red center of one block was very nice quilted with dark green thread. It had a very small border and free motion quilting.
 I found a quilting pattern that had a center flower and thought that I could change colors to make it fit on the block. It is a nice quilting pattern, but it was not right for this quilt. Making it did give me an idea for making another quilt. I could make quilted 8″ squares with solid fabric and put them into a quilt. Very fast and easy. That’s for another day.
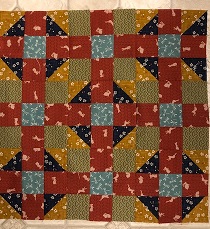


 .
.  I’m still using the Japanese fabric. I can see several more quilts made with this fabric. Today, as I was cutting, I put several large pieces aside for another quilt.
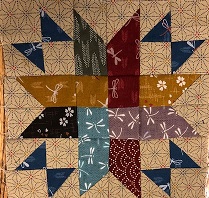

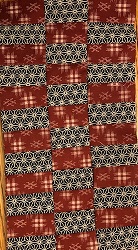
 Rail Fence is quilted in the ditch. The quilting doesn’t show. It just holds the quilt together. Some of the black squares are quilted with a medallion. I don’t have the pattern but I can copy it to quilt the remainder of the squares.


 Her petticoat has several layers of lace. It is elegant even though it is muslin, She will have to have full skirted dresses when she wears it. When I make a slimmer dress, I will have to make another slimmer petticoat.
 She has a chemise. It doesn’t fit her very well and I will have to adjust the size. It is lined which makes it heavy. I think it would be better with one layer or a lighter weight fabric.
 I made a doll quilt as a challenge for the Guild. I named it “Annie Louise’s quilt”. It belongs to her. There was a piece of fabric left over and I decided to make a day dress for her. I laid muslin on her old dress and made a pattern for the new dress. It was almost accurate. It just needed a few adjustments before I cut the good fabric. Now, I can use the muslin patterns and make other clothes.
 There are two tucks at the bottom of the skirt. I have a border guide foot that I’ve never used. It was great to keep the tucks even. There are many other ways to use this foot.
 Some are pastel. Some are green and white. They are all very plain if left on their own.
 The pale green and coral blocks are set in a nine patch format. Five of the blocks are in a straight setting and four are in a diagonal setting. The center block is a straight setting with coping strips on four sides that enlarge it to the size of the blocks that are set in the diagonal setting. The strips are the same color as the outer border. The four diagonal set blocks have coping triangles. The triangles are two different colors which make a star. The four corners have coping strips on two sides. They are the same color as the outer triangles, which make it look like a border. There is a small outer border that is the same color as the star and then the outer border.
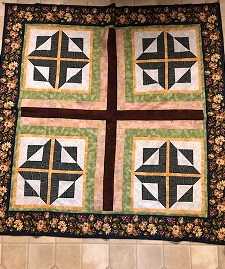 I wanted to do something different with the green and white blocks. They needed brightening up so I put two together with gold sashing. I auditioned several fabrics but couldn’t find anything that looked good. Then, I found the border fabric. I pulled the sashing colors from the border fabric and the quilt came together. It just happened. The inner border is small because that is all the fabric that I had left after making the larger sashing in the center. This quilt was a happy accident. Maybe I should call it by that name.
 Twenty five of the center blocks are finished and pieced together. The blocks are hand quilted and then individually bound and sewn together in the pot holder method.
 Twelve blocks are finished and waiting to be sewn to the main quilt.
 Three blocks are quilted, the binding is sewn on and is waiting for the binding to be tacked down.
 Ten blocks need to be quilted.
