
A little while back, one of my daughters came to my house for a visit. I brought out the “give away” bin and she chose a piece. I mentioned that I was working on another piece and it was going into the “give away” bin. When she saw it, she folded up the piece that she had chosen and put it back into the bin. She said “I’ll wait for that one.” I had intended to work on it right away, but other projects kept getting in the way.
 The wall hanging is made of hand and commercial dyed fabrics and a few other fabrics that went with it. I machine quilted it with free motion quilting, even feed quilting and ruler quilting. It is not quite finished because the binding is in N. H. I have sewed the frame on the inside of the pink last border. When the binding is sewn on, I will sew another frame and then quilt something between the frames. It shouldn’t take too long to finish.
 Miss Molly is examining the quilt.
What I have learned about ruler work.
It should be done on a flat bed machine with enough space in the front and back to hold the ruler tight. My machine is slanted on the front and has very little space in the back to hold the ruler.
The table should be at an ergonomic height. Your arms and hands should be at a comfortable angle. My dining room table is too tall and it is tiring to use the ruler.
The spot where the needle ends should be marked. The needle sews 1/4″ away from the edge of the ruler. It would be easier if you had a target to aim for.
The lighting should be good, so you can see where the ruler is behind the presser foot.
Ruler work is not enjoyable. Maybe, when I get back to my sewing room in N. H. and all of the above items are corrected, I will enjoy the process better. I haven’t sewn beyond a straight seam yet. The books make it sound so easy.
I enjoy free motion quilting very much. Many of my quilts have been free motion quilted.
I have seen some tutorials from Leah Day about even feed foot quilting. That sounds interesting. She has a book with three quilts and all the instructions. There are tutorials about all the processes including selecting fabric, processing the fabric before cutting and many more.
There is always something new to try when you quilt.
Have a great day and happy quilting.

 I have finished 25 of the 169 center blocks of the Dear Jane quilt. That is not counting the border triangles, but I will think about them when I finish all 13 X 13 rows of the center. Each block is hand quilted and bound in the pot holder method. Then they are sewn together. I’m really addicted to making this quilt even though I once said that I would never make a Dear Jane.
 I have also finished a small embroidered wall hanging. I embroidered a Donna Dewberry pattern. Her embroideries look similar to her painting. She uses many colored threads in the embroideries and sometimes repeats a color. When I sew the embroidery, I do not have a backing in the hoop. I heavily starch the fabric and add batting. I first sew a tracing line around the hoop. It outlines the pattern. Then, after the embroidery is finished, I add the backing and use the line to add the first border. It makes a straight line and automatically centers the embroidery. I usually have two borders and stitch a feather stitch on the seam lines. This attaches the top to the backing. The binding is cut smaller than the binding for a large quilt. I like to hand tack the binding down. On some small quilts, I add a flange binding. It requires no hand work as it is sewn to the back of the quilt and turned to the front. These little quilts ( 12″ X 12″) are almost instant gratification.
 I searched for a pattern to use all those colors and decided to make a king size quilt using squares sewn together, cut again at an angle using a template and then sewn back together again.
 The first one that I made has been hanging in the top of the living room in the Maine house for fifteen years. The other is a small table mat.


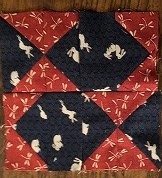
 It is because your joining line was sewn below the X on the head of the geese. This is the X .


 I made a little basket quilt several years ago. When it came to the top of the pile, I decided to use it to practice machine quilting. Miss Molly inspected the quilt and said that it was good enough for her to take a nap on it.
 quilting.


 Cut muslin 14″ high and the width of the quilt minus 4″. I used an old sheet. The length of a queen sheet is just the right size for a king size quilt.
 With the seam centered in the back, press the tube. It will be approximately 6″ wide.
 Pin to top of the quilt. I pinned the top with the pin heads facing out so that I could remove them as I sewed. The bottom was pinned sideward so that the pins would be out of the way when the second seam was sewn.
 Thread the machine with monofilament thread in the top and regular thread in the bottom. Mary recommended Bottom Line thread. Superior mono thread is soft, not at all like the old mono thread that was like fishline. It runs through the machine nicely.
 Greatly reduce the top tension, (Down to 1) Set length as long as possible.
 With the right side of the quilt facing up, sew the facing to quilt at top and about 5 1/2″ down. I sewed the top seam in the intersection of the binding, taking out the pins as I sewed. When I came to the bottom stitching, I found that if I sewed 6″ down, I would sew in the border seam. I removed the pins as I sewed, making sure that the sleeve was straight under the quilt.
 June’s wall hanging is a little boy who is fishing with his dog. He is out of school for the summer and is having fun.
 July’s wall hanging is Sunbonnet Sue dressed up in red, white and blue clothes. She is very patriotic.
 August’s wall hanging is a statement that I Love my garden. Usually the garden is in full bloom in August.
 September’s wall hanging is the same little boy from June. Now, he’s back in school with so much school work that he almost doesn’t have time to do anything else.


 I have several scissors, the little pink one and the one with the pink ribbon have curved blades so I can cut close to an embroidery or the end of a seam. The gray one with the purple ribbon is a paper scissor. I paid $10.00 for it and it was a great buy. When I have it sharpened, I have to be careful not to cut myself. I don’t use the little rotary cutter very much, but keep it in the glass so that I won’t loose it.
 I use the little screwdriver to tighten presser feet and the needle. Also to loosen the plate. The tweezers are handy for getting things out of tight spaces. The wooden iron is used to press seams so that I don’t have to keep getting up to use a regular iron.
 The little screwdriver is handy when the other one is too tall to fit into a space. The pencil sharpener was always lost until I left it in the glass. The chalk is used for marking, The flash drive has my embroideries on it. When it is in the glass, I don’t have to look for it.