
Making fabric baskets is easy and fun. They make a great gift. You would probably keep a few for yourself. The basket can be used for candy, office supplies, flower pot holders or anything that your imagination can think of.
The supplies needed are two pieces of contrasting fabric. They can be any size from 8″ . square to 12″ square. A piece of batting the same size as the fabric and four buttons are also needed.
 Place the two pieces of fabric together, right sides together. Place batting under the fabric and sew around the edge with a 1/4″ seam. Leave a 3″ to 4″ opening so that you can turn the piece right side out.
 Trim the batting and the corners before turning the piece right side out. Press carefully. Topstitch the edge, sewing up the opening. Quilt the piece. You could practice free motion quilting or quilt in straight lines. I added piping to the edges of this basket to see if I would like it. It does add another element, but does take longer to make.
 Fold the piece in half. Measure and mark 2″ on the fold and up the edge. Draw a line between the two marks. When sewing on the line, back stitch to lock stitches in place. The 2″ mark is for a 12″ piece. You would mark a smaller triangle for a smaller piece. The measurement is how tall the basket will be. You might want some baskets taller and more thin or some shorter and fatter.

Refold the piece the other way and repeat what you did on the first fold. This is more awkward, so I pinned the points to keep them even while I marked and sewed.
When you fold the piece in half, the inside fabric will be the outside of the basket. The fabric on the outside will be the inside of the basket. It does sound backwards. I’ve made a lot of baskets forgetting this. They were pretty anyway, but not what I had planned.
 Before you turn the basket right side out, tack the points down, all going in the same direction.
 Turn the basket right side out. Fold down and tack the points with a button, sewing completely through the basket and point.


Enjoy or give away. It is a nice gift that uses very little fabric.
If any of the instructions are confusing to you, just let me know and I’ll try to help.
Have a great day and happy quilting.

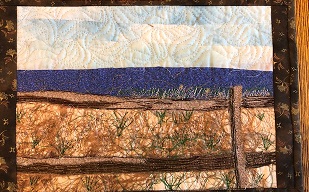
 I decided to make an underwater scene with cut out fish from a leftover scrap. A peacock feather became a piece of coral. I did some thread painting and it turned out very nice. After I made the underwater scene, I wondered if I could make a landscape out of the tiny bits and pieces of fabric that should have been thrown away. When I was working, I had several photos taped to my work station. They were of places that I had been and enjoyed. Maybe I could use the photos and commit the scenes to fabric. The scenes were small so the first thing that I did was enlarge them to 8″ by 11′. It seemed the perfect size for a small wall hanging.
 The first one that I made was terrible, It was a mountain scene in N. H. I had written a mission statement before I started the Gaa-barge project and it stated that no matter how bad a piece was, it would remain in the project. This one is still with the others, mainly to remind me that not all quilts are successful. Some are really, really bad.
 Moda Blockhead 2, block #10 was designed by Jo Morton. It is a 12″ block called Duck and Ducklings. It went together easily. I’m using the Japanese fabric for the Moda blocks. Most of them go very well with the printed fabric. I try to use that fabric in most of the blocks, although, some blocks do better without it. I look forward each week for the Moda pattern. Most are made up quickly.
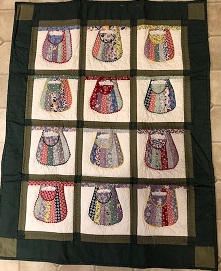
 This fun wall hanging hung on the back of my extra dining room chair for a long time. I should bring it out again.
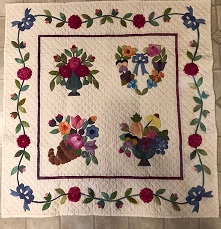


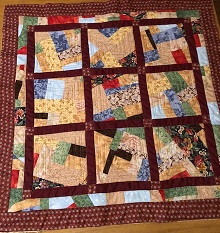
 This is one of the blocks that my Mother pieced. I like the way she lined up the stripes. I can tell which blocks she pieced as she used yellow paper. I used white paper. Of course, when the backing is on there will be no way of telling who did what. It will be one quilt made by two generations.

 Several years ago, I saw a pattern at the Vermont Quilt Festival. The vendor also had the background fabric which went from dark blue to medium blue. It was perfect. I used batique fabric for the fish. The fabric had occasional dots which I used for the eyes. It was hand quilted. A friend asked me to put it into a show, so I did. Later I heard that several people went to a quilt shop in Bangor looking for the pattern and the fabric. They soon ran out and started asking if the customer had been to the show. It caused quite a stir at the time. This was the first time that I used batique fabric. It also combined two of my favorite techniques, applique and hand quilting.
 It is August and I should change the little wall hanging on my wall. The July wall hanging will have to hang there until I go back to N. H. later this month.

 The Simple Sampler 2 block came today. It was very easy. I really do like making flying geese. There are so many ways to make a flying geese. The Lazy Girl flying geese used to be my favorite way to make one. Now, I prefer the Kimberly Einmo flying geese ruler. Deb Tucker also has a flying geese ruler that I hear is very nice. I’ve never used it. These flying geese were made by cutting out a rectangle and then sewing squares on the diagonal on each end. I try, at first, to make the blocks with instructions given by the designer. At times, I use my own methods.
